No software to install
GUIDE
Start here: the complete walkthrough for your first Chinese subtitle
This is the long version: every button on the screen, what it does, how long the tool takes and why, how big a file to upload, and what each panel means after the subtitles appear. It assumes nothing — no account yet, no idea which format to pick, no idea what a segment is. Read it once, then the second file takes about a minute.
Sign in to uploadhow to use subchinese step by step
OUTPUT PREVIEW
你吃饭了吗?
Have you eaten?
QUICK ANSWER
Sign in, press Choose a file, pick a Chinese video or audio file from your device (1 to 4 minutes of clear speech is the right first test), keep the three layers on, press Generate subtitles, wait roughly 50 to 60 seconds per minute of audio, fix the characters that the recogniser got wrong, then export SRT. Everything you export stays under Account.
WHAT YOU GET
A focused path from speech to subtitle file.
15 free minutes a month
SRT, ASS and plain text
Every button explained
Real waiting times
HOW IT WORKS
The whole job, in six steps
- 01
Create the account and confirm the email. The free plan is attached to the account, not to a download.
- 02
Press Choose a file or drag a file onto the upload box, and pick something you already own.
- 03
Leave the translation language as English and press Generate subtitles. The layers decide what comes back.
- 04
Wait. One minute of audio is roughly one minute of processing, and the screen tells you which stage it is on.
- 05
Click any line whose characters are wrong and fix it. The timing stays attached to the line.
- 06
Press Export and take SRT, TXT or ASS. The same files stay under Account.
What happens between your file and the three output files
The tool is one pipeline with five stages, and knowing the stages is what makes the waiting time predictable instead of mysterious. Nothing here runs on your computer: the browser uploads the file, and the five stages run on the server.
Stage 1, upload: your file goes from your device to storage. This stage is the only one that depends on your internet speed, and it is usually the longest stage for a big video and the shortest for a voice memo.
Stage 2, audio extraction: the server strips the picture away and keeps only the sound. A 200 MB video can become a 3 MB audio file here, which is why the processing cost depends on minutes of speech rather than on file size.
Stage 3, speech recognition: the audio is transcribed into Chinese characters with timestamps. This is the heavy stage and the one that scales with audio length.
Stage 4, translation and pinyin: each recognised line gets pinyin (pronunciation for each character) and an English line, aligned to the Chinese rather than translated as a block of paragraphs.
Stage 5, segmentation: the result is cut into segments — one spoken phrase each, with a start time and an end time. The segment is the unit you edit later, and it is what becomes a subtitle line in SRT or ASS.
One consequence worth knowing before the first upload: because the cost is minutes of speech, a high-resolution video and the same video compressed to a smaller size take the same processing time. The only thing a bigger file costs you is a longer upload.
What file to upload, and what size is actually sensible
For a first test, use one to four minutes of clear speech. That is long enough to show you what the output really looks like — including where the recogniser fails — and short enough to leave most of a free month untouched.
The size limit is per plan, not per file type: 10 MB on Free, 50 MB on Learner, 200 MB on Pro, 1 GB on Studio. Measured across the jobs already processed on this site, the average upload is about 11 MB and the largest is about 42 MB, so most first files fit inside the Free limit only if they are short clips or audio.
If your clip is longer than the limit allows, trim it rather than compressing it. Compressing to fit changes nothing about the processing cost (minutes of speech stays the same) and costs you video quality in the preview.
Formats: MP4, MOV, MKV, WebM, MP3, M4A, WAV and the usual relatives. Both video and audio are accepted because only the speech is used for the transcript.
One thing the tool will not do: fetch a video from a link. If the clip currently lives on a streaming site, save it to your device first — that step is deliberately outside the tool.
| What you have | Typical size | Fits Free (10 MB)? | What to do |
|---|---|---|---|
| Voice memo, 1 minute | 0.5 to 1 MB | Yes | Upload it directly — this is the best first test |
| Phone video, 2 minutes | 20 to 60 MB | Usually no | Trim to one minute, or use Learner |
| Downloaded clip, 5 minutes | 15 to 40 MB | No | Trim, or upgrade for the month you need it |
| Audio-only MP3 of a lecture | 3 to 6 MB per hour | Often yes | Audio alone is enough; the picture is not required |
| Full episode, 45 minutes | 300 MB to 1.5 GB | No | Studio, and expect a long processing wait |
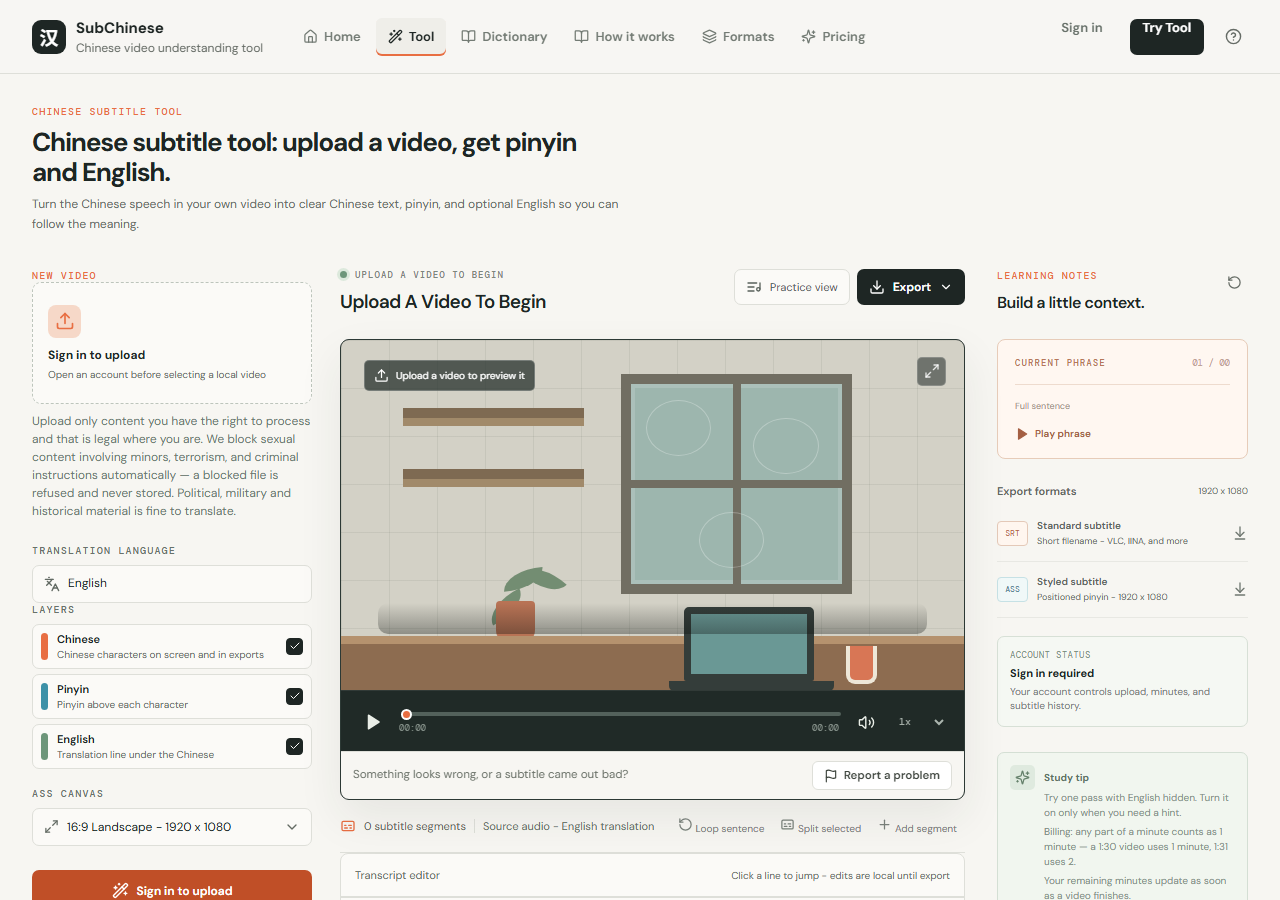
The screen, region by region
The tool page has four regions, and every button lives in one of them. Reading this section once saves the "where do I click" phase entirely.
- Left column, NEW VIDEO: the upload box. Before sign in it reads "Sign in to upload" and the button at the bottom is locked. After sign in the same box accepts a click or a drag and drop.
- Left column, TRANSLATION LANGUAGE: shows "English" as plain text, not a dropdown. That is deliberate — the product does Chinese speech into Chinese text, pinyin and English. A dropdown would imply Japanese or Spanish output that does not exist.
- Left column, LAYERS: three switches — Chinese, Pinyin, English. Chinese puts the characters on screen and in the exports; Pinyin puts the pronunciation above each character; English adds a translation line under the Chinese. All three are on by default and they can be switched before generating.
- Left column, ASS CANVAS: the aspect ratio used by the positioned ASS export — 16:9 Landscape 1920x1080 by default, with portrait options for phone video.
- Middle, the player: shows the video you uploaded with a timeline. While nothing is uploaded it says "Upload a video to preview it" and the title reads "Upload A Video To Begin".
- Middle, top right of the player: two controls — "Practice view" (hides parts of the interface so you read instead of fiddle) and "Export" (the dropdown that produces the files). Both are disabled until there is something to export.
- Right column, LEARNING NOTES: builds a small context block around the current phrase, so a line of dialogue is not studied in isolation.
- Right column, CURRENT PHRASE: the segment under the playhead, with "Play phrase" to hear just that line and "Next sentence" to step through them.
- Right column, Export formats: two shortcut buttons, SRT (standard subtitle) and ASS (styled subtitle, positioned pinyin). These are the quick path; the full set lives in the Export dropdown and in the export banner that appears when processing finishes.
- Right column, ACCOUNT STATUS: whether you are signed in, which plan is active and how many minutes remain this month.
- Bottom, the transcript editor: the segment list. Before anything is generated it shows "0 subtitle segments" and the hint "Click a line to jump — edits are local until export".
- Bottom toolbar above the editor: Loop sentence, Split selected, Add segment. These are the three editing actions, and they are what turn a rough transcript into subtitles you can use.
Step 1 — create the account and confirm the email
Press "Sign in" in the top right, or "Sign in to upload" in the left column. Both lead to the same place. You can sign in with Google or with an email address and a password.
If you use an email address, a confirmation link arrives within a minute. Until you click it, the upload button stays locked and the tool tells you so. This is deliberate: an unconfirmed account cannot be recovered if a password is lost later.
The Free plan starts immediately: 15 minutes of audio a month, files up to 10 MB. No card, no trial countdown. The allowance resets monthly, and existing subtitles remain downloadable when the allowance runs out.
Step 2 — choose the file (click, or drag and drop)
After signing in, the box at the top of the left column becomes active. Click it to open your file picker, or drag a file from your desktop onto the box. The label on the button changes with state: "Sign in to upload" before sign in, "Verify email to upload" while the email is unconfirmed, "Choose a plan to upload" if your plan has run out, "Generate subtitles" once a file is loaded.
When the file loads, the player in the middle takes the video and the title above it changes from "Upload A Video To Begin" to the file you picked. Nothing is processed yet — this is still the preparation stage.
If the file is rejected, read the message: it names the actual size and the actual limit for your plan. That error is never vague on purpose — the numbers are there so you can decide whether to trim or upgrade.
Step 3 — decide what you want back: the three layers
The three switches are the product. Chinese gives you the characters. Pinyin gives you, for each character, the pronunciation it actually has in that word — not a dictionary guess — so you can see which syllable belongs to which character. English adds a line-by-line translation under the Chinese.
Leave all three on for the first file. The point of the first run is to see the real output, and turning a layer off before you have seen it only makes the output harder to judge.
After that, the layers are how the same clip changes purpose. English off turns the transcript into reading practice. Pinyin off gives you clean subtitles for an audience that reads Chinese. Chinese off leaves a pinyin and English track for a learner who cannot read characters yet.
The ASS canvas matters only if you are exporting positioned pinyin: it decides the frame the subtitle layout is built for. Landscape 1920x1080 for normal video, portrait for phone-shot clips. Picking the wrong one does not break the file, it just places the pinyin for a different frame shape.
Step 4 — press Generate subtitles, and what the wait really is
Press "Generate subtitles" at the bottom of the left column. From that moment the button shows a spinner and reads "Building subtitles". The upload starts, then the four server stages run in order.
Measured on the jobs already processed on this site: upload takes a median of about 21 seconds, the recognition and translation work takes a median of about 55 seconds, and the whole visible process from press to segments lands at a median of about two and a half minutes. The rule of thumb worth remembering is about 50 to 60 seconds of processing per minute of audio.
Why it takes that long: the speech recogniser is not streaming one word at a time, it re-reads the audio to place accurate boundaries, and every line is then translated and re-aligned against the Chinese. That re-reading is what produces segment timings that hold up in a player — a fast, sloppy pass would give you text with timestamps that drift.
You can close the tab. The job keeps running on the server and the finished result is listed under Account, so nothing is lost — it is just less visible than watching the progress.
If the progress stops moving for several minutes, that is worth reporting rather than refreshing: the "Report a problem" button under the player sends the error together with the job id, so the failure can be looked up from this side.
| Audio length | Typical wait | What is happening |
|---|---|---|
| 30 seconds | 40 to 70 seconds | Upload is instant, recognition is one pass, translation is a handful of lines |
| 4 minutes | 3 to 5 minutes | Recognition dominates; the segment count grows to dozens of lines |
| 15 minutes | 10 to 18 minutes | Recognition and translation both scale, alignment is the slow part |
| 45 minutes | 30 to 60 minutes | Studio territory; keep the tab open or come back later through Account |
After the subtitles appear: what each panel is for
This is the part most walkthroughs skip, and it is where the tool actually becomes useful. When processing finishes, the editor fills with segments and a banner appears above it. Each region below does one job.
- The export banner, "Subtitles ready — N segments": four buttons in a row. SRT downloads the standard subtitle file. TXT downloads plain text with no timing. ASS downloads the positioned version (marked Pro when your plan does not include it). Save my version stores your corrected transcript so the fixes survive beyond this browser session.
- The format help links in the banner, "What is an SRT file?", "What is an ASS file?" and "SRT vs ASS": three pages that explain the difference at the moment you need it, instead of sending you to the menu to look for documentation.
- The segment list (Transcript editor): one row per spoken phrase, each with its start and end time. Clicking a row jumps the player to that moment — the hint "Click a line to jump" is literal. Double-clicking the text lets you correct the characters, and the timings stay attached to the line you corrected.
- Loop sentence: plays the current segment on repeat. It is the single most useful button for language study, because hearing one line five times beats hearing five lines once.
- Split selected: cuts the selected segment into two at the playhead. Use it when one segment swallowed two sentences and the subtitle sits on screen too long.
- Add segment: inserts a new empty segment at the playhead, for speech the recogniser dropped entirely — usually a very short interjection or a line under music.
- Practice view: reduces the interface to the parts you need for reading and listening, so the controls stop competing with the text.
- Report a problem (under the player): opens a short form. It sends the job id plus whatever you type, and optionally one screenshot that is compressed in the browser before it is uploaded. This is how a failure gets diagnosed instead of guessed at.
- Export dropdown (top right of the player): the same files as the banner, without the explanations. Use it when you already know which format you want.
Step 5 — correct what the machine got wrong
Expect errors in three places: names, brand words, and speech where two people overlap. Every speech recogniser has this failure mode; the editor exists because of it.
The efficient habit is to play the clip once with the transcript visible and stop only where a character looks wrong. Reading every line character by character is slower and finds fewer mistakes, because correct text looks unremarkable and errors jump out.
Two rules keep the file usable: fix characters in place rather than rewriting the sentence (timings stay aligned), and use Split selected only where the on-screen duration is genuinely too long. Over-splitting produces flicker in the player, which is worse than a slightly long line.
Nothing you type is uploaded until you press an export or Save my version. That is why the editor hint says "edits are local until export" — if you close the tab without saving, the corrections are gone but the original transcript stays.
Step 6 — export, and which of the three files to take
All three exports come from the same corrected transcript, so the decision is about where the file is going next, not about quality.
File naming: every export is named after your source video with a suffix, so a folder of clips stays in the same order as the videos without renaming anything.
Where the files live afterwards: under Account, listed by name. That page — not the browser tab — is the answer to "where did my subtitle go", and it is also where the minutes used this month are shown.
One limit worth stating plainly: positioned ASS and a burned-in MP4 are plan features. On Free you get SRT and TXT; the ASS button is marked with a Pro badge rather than hidden, so you can see what the upgrade actually buys.
| Format | What it keeps | Use it when | Opens in |
|---|---|---|---|
| SRT | Text and timings | The file has to work everywhere | VLC, IINA, QuickTime, YouTube, most editors |
| ASS | Text, timings, position and styling | Pinyin must sit above the character it belongs to | VLC, PotPlayer, Aegisub, most NLE imports |
| TXT | Text only | Notes, documents, searching, pasting into a dictionary | Anything |
The account page: your files, your minutes, your plan
The account page is the part people skip until they need it, and then cannot find. It holds four things.
- Minutes used this month and the allowance for your plan — the number that decides whether a long file should wait until the reset.
- Every job you have run, with its status, so a job started in another tab can be picked up later and its exports downloaded again.
- The plan block: what is active, when it renews, and the cancel control. Cancelling stops the next renewal and does not shorten the period already paid for.
- Sign out, and the email confirmation state if the account was never confirmed.
What each plan actually allows
Minutes are counted as audio processed, rounded up to the next whole minute. A 1 minute 31 second file uses 2 minutes. Re-running the same file costs minutes again, which is why correcting the transcript is cheaper than generating a fresh one.
| Free | Learner | Pro | Studio | |
|---|---|---|---|---|
| Minutes per month | 15 | 120 | 500 | 2,000 |
| Max file size | 10 MB | 50 MB | 200 MB | 1 GB |
| Chinese + pinyin | Yes | Yes | Yes | Yes |
| English line | Yes | Yes | Yes | Yes |
| SRT and TXT export | Yes | Yes | Yes | Yes |
| Positioned ASS export | No | No | Yes | Yes |
| Burned-in MP4 | No | No | No | Yes |
| Price per month | $0 | $6.99 | $14.99 | $29.99 |
When something goes wrong: twelve symptoms, in order of how often they happen
| What you see | What it means | What to do |
|---|---|---|
| The upload box reads "Sign in to upload" | You are signed out | Press Sign in, then come back to the tool page |
| The button reads "Verify email to upload" | The account exists but the email is unconfirmed | Open the confirmation link, or resend it from the account page |
| "File is larger than the limit" | The limit belongs to the plan, not to the file type | Trim the clip, or use a plan with a bigger limit |
| Nothing happens after Generate subtitles | The job is queued, or the tab lost its connection | Wait a minute, then open Account — the job kept running |
| The progress bar sits at one stage | Recognition on a long or noisy file | Give it the time from the table above before assuming a failure |
| The transcript is half empty | Speech under music, or two speakers overlapping | Fix by adding segments manually, or upload a cleaner section |
| Chinese characters are wrong in names | Normal recogniser limitation | Correct the line; timings stay attached |
| Pinyin is wrong on one character | The recogniser chose a different reading of a polyphonic character | Correct the character and the pinyin follows it |
| No English line appears | The English layer is off | Switch the layer back on; each layer is stored separately |
| The ASS button says Pro | Positioned ASS is a Pro feature | Export SRT, or use Pro for the month you need it |
| Minutes dropped to zero | The monthly allowance is spent | It resets next month; existing subtitles stay downloadable |
| The downloaded file will not open | The player expects a different container | Use SRT — it is the format every player reads |
What this tool will not do, stated plainly
It will not download from a link or a streaming platform. That boundary is deliberate — both legal and practical — and the workaround (save the file to your device first) is stated on every entry page rather than discovered halfway through.
It will not translate into anything except the language chosen at upload, and English is the only option today. The language row is plain text for exactly that reason.
It will not promise clean output on heavy music, crosstalk, or strong regional accents. It tells you where the weak lines are, which is more useful than a claim of perfect accuracy — the correction step is part of the product, not a failure of it.
It will not keep your source video indefinitely. The source is temporary; the transcript, the segments and the exports are what persist.
USE YOUR OWN VIDEO
Sign in to uploadStart from a file, not an existing subtitle track.
Sign in first, then upload a local video, review the generated transcript, keep English optional, and download a subtitle file.
QUESTIONS
First-file questions
Do I need a card to try it?
No. The Free plan starts without payment details and includes 15 minutes of audio a month.
Can I use it on an audio file with no video?
Yes. Speech is the input; a voice memo or an MP3 works exactly like a video file, and it is the cheapest way to test quality.
What is the best first file?
One to four minutes of clear speech that you already own. Long enough to show real errors, short enough to leave most of the month untouched.
How long should I expect to wait?
About 50 to 60 seconds of processing per minute of audio, plus upload time. A one-minute clip usually lands under two minutes end to end.
If I close the browser, is the work lost?
No. The job finishes on the server and the result is listed under Account.
Do I have to correct the transcript?
Only where it matters. Exporting without corrections is fine for gist; correcting names and numbers is what makes the subtitles usable for an audience.
Which export should I take the first time?
SRT. It opens in every player and editor, and it is the file most other tools expect.
Where are my files kept?
Under Account, listed by name, with the minutes used for the month on the same page.